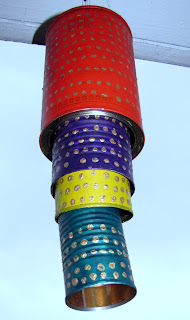
Make Windchimes from Metal Cans
Spring is usually the time when wind-chimes come out to hang. I could see them hanging in many a houses but instead of buying one, I decided to challenge myself into making one. In the spirit of recycling, I began to look around for things that could be used to make windchimes. I narrowed down on metal as the material of choice because it had to make a sound when it clanked together. I also did a google search and saw a few ideas. I decided, metal cans it will be.
I spent most of spring collecting metal cans of various sizes. Finally I made two different kind of wind chimes.
Cascading Can Chime
When I looked at my collection of metal cans, I saw four of them fit inside each other just perfectly. That led me to this cascading wind chime design. I used tiny jingle bells to anchor the cans on the metal wire and also for the sound they make.
The other Windchime
This is other windchime I decided to make with my leftover can collection. I used a plastic lid from a large yogurt container and used it to hang the cans in a more traditional windchime configuration.
I spent most of spring collecting metal cans of various sizes. Finally I made two different kind of wind chimes.
Cascading Can Chime
When I looked at my collection of metal cans, I saw four of them fit inside each other just perfectly. That led me to this cascading wind chime design. I used tiny jingle bells to anchor the cans on the metal wire and also for the sound they make.
| metal cans of different sizes |
| metal beading wire |
| small bells |
| acrylic colors |
- Remove any labels from your metal cans. This can be done by soaking the cans in water for a few hours. Clean the cans to prepare them for painting.
- I used bright acrylic colors to paint the cans. Do at least 4 coats of paint, letting the paint dry completely between coats. It is better to do more thin coats rather than fewer thick coats. Acrylic colors are water-proof once dry so it was the perfect choice for an outdoor windchime.
Cans after one coat of paint - I added golden polka dots using the back of a wooden skewer.
- Punch a hole at the center of the metal cans. Using a nail and hammer is ideal.
- Cut out an approximate length of the metal wire. I used the total length of all the metal cans as a guide.
- Tie one or more jingle bells at one end of the wire.
- Thread the wire through the smallest can so that it rests over the bells.
- Tie another bell a little above this can. Check the spacing to see that the next can will overlap this can.
- Thread the second can so that it rests over the second bell.
- Continue tying bells and hanging cans using the rest of your bells and cans.
- Once the last can is hung, twist the remaining wire to form a loop for hanging the wind chime. I also used a little bit of duck tape to make the loop a little more secure.
The other Windchime
This is other windchime I decided to make with my leftover can collection. I used a plastic lid from a large yogurt container and used it to hang the cans in a more traditional windchime configuration.
| metal cans |
| metal beading wire |
| small bells |
| acrylic colors |
| plastic or metal container lid |
- Remove any labels from your metal cans. This can be done by soaking the cans in water for a few hours. Clean the cans to prepare them for painting.
- I used darker acrylic colors to paint the cans. Do at least 4 coats of paint, letting the paint dry completely between coats. It is better to do more thin coats rather than fewer thick coats. Acrylic colors are water-proof once dry so it was the perfect choice for an outdoor windchime. I also glued some buttons on the cans.
All painted and ready - Punch a hole at the center of the metal cans and on the plastic lid at the points where the metal cans will be hung (I had 4 on the sides and one in the center) . Using a nail and hammer is ideal.
- Cut out 5 equal (or unequal depending on your design) lengths of the metal wire.
- Tie a jingle bell at one end of each wire. Thread the wire through the hole in the can so that it rests over the bell.
- Thread the other end of the wire through the hole on the plastic lid and tie it in a knot. I also used duct tape for more secure hold.
- Repeat this process and tie all the cans to the lid.
- For the center can, leave some wire on the top to create a hanging loop before knotting it on the top of the lid.


Comments
Post a Comment
I really appreciate your feedback! Thank you!