Posts

Showing posts with the label diy

Weekly recap - Super seeds no bake energy bar, beet kofta and party custard

Image
Last week I tried a couple of new recipes, so I thought this is a good week for a weekly recap to showcase them. I had ordered an energy bar from bigbasket since there was an offer on it. Otherwise, those things are expensive! The daughter loved the bar, so I saved the wrapper for reference to create my version of it. It contained seeds like sesame and pumpkin along with figs. The daughter is not excited about eating seeds on their own and she kind of hates the look and texture of dates. So I looked at it as an opportunity to feed her superfood seeds and dates. I based it on my dates ladoo recipe. Super Seeds Energy Bar (nobake) Seed and fruit energy bar Ingredients: 1 cup mix of raisins, dates, and figs* 1 tbsp ghee 1 tbsp honey 1/4 tsp rock salt 1/4 tsp cinnamon powder 3/4 cup oats 1 cup nuts and seeds* Method Dry roast oats in a small iron kadhai till crisp; about 4 minutes. You can dry roast the seeds and nuts if they are no...

DIY Condiments - homemade ketchup, homemade nutella and date-tamarind chutney

Image
I used to buy bottles of ketchup and nutella but then I observed that the daughter was consuming large quantities of both of these condiments :). I switched to Heinz ketchup because they claim to be preservative-free but then I thought that it is so easy to make ketchup at home. Why am I not doing it myself? That's how I started on my DIY condiment making routine. Once ketchup was handled, I started making nutella. I am always worried about giving the kid any packaged products. Since she is not into eating our regular Indian food so much, these condiments are a way to get her to eat something healthy, like a vegetable paratha. Homemade Tomato Ketchup This is a very easy recipe with a handful of ingredients. Ingredients: 1 kg red,juicy tomatoes 1/2 cup sugar 1/2 cup apple cider vinegar* 1/2 tsp ginger powder 1/2 tsp pepper powder 1 to 1.5 tsp rock salt* Method Chop the tomatoes into large pieces and pressure cook them without water for 3 whistles on medium flame.* ...

Glass bottle vases and plastic bottle flowers

Image
Last summer, I did some crafting on glass bottles and vases. I love glass as a material. I like shiny and glamorous things :) (although I am sure you wouldn't guess that if you saw me) Lets start with the shiniest of them all. I used glass gems on this one. These glass gems come in a variety of colors at any craft store. I first sorted the gems by their color. I also cleaned the bottle. I removed the label, washed and dried it beforehand. I used some rubbing alcohol to clean the outside of the bottle before gluing the gems on. A clean surface is highly recommended for any glass craft. I did not want to cover the bottle entirely with the gems and wanted some of the beautiful color of the bottle itself to peek through. I drew a design on the bottle with a marker to roughly mark where I need to leave out the gemstones. I tried to keep the lines equidistant but I am not good with measuring and straight lines. I just tried my best. I glued the gem stones starting from the bot...

DIY bottle lamp

Image
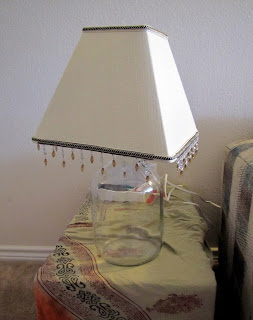
Today's post is just me showing off the new lamp which we made using a glass bottle as a base. Last year, when we had gone for strawberry picking at a local farm, they had some gallon cider jugs (like this ) out to take for free. I have a thing for glass and I just couldn't pass up a beautiful and free glass jug, even though I had no idea what to do with it. I looked around for ideas sporadically on the internet and I finally decided to make a lamp out of the bottle. We got a Bottle Lamp kit from walmart and a lamp shade with ring with goes under the lamp. The lamp kit makes it very easy to convert a bottle into a lamp. There are lots of tutorials on the internet for bottle lamps ( like this ). I did not drill a hole in the bottle for the wire, like some tutorials say. I just let the wire hang behind and it is not very noticeable at all. I had used a plain lamp shade and the lamp was looking a bit boring. I decided to dress it up with ribbon. I found a nice ribbon at ...

Valentines for kids - Homemade Playdough (without cream of tartar)

Image
This is 'Valentines Day' week and all the kids (rather their parents) must have put together the valentines to hand out to their classmates. Last year was the first time we were doing Valentines since my daughter started preschool. I always like to give homemade stuff whenever I can. Last year we gave pretzel hearts, which I might have to write about in a different post. This year, we decided on play-dough. My daughter is a big fan of play-dough like most kids her age. I was thinking of making a homemade version ever since I saw about it somewhere on the internet. I finally got down to actually making it after just thinking about making the play-dough for months :) I looked at several play-dough recipes and almost all used cream of tartar. I did try to find it at the grocery store. Maybe I wasn't looking hard enough because I could not find it. So I had to look for recipes without cream of tartar. I read somewhere that cream of tartar is an acidic substance which is ...

Cardboard play kitchen

Image
During the summer I worked on a few craft projects; one of which was a cardboard play kitchen. It is made completely from recycled materials which would otherwise have ended up in trash. I had seen the idea on Spoonful and immediately loved it. It took me a few months to really get working on the idea because it seemed kind of daunting; but once I got to it, it was fun. I am so glad this went from bookmark to reality because my daughter was so excited about it while we were building it and it is still her favourite "toy". finished kitchen First I started collecting cardboard boxes. 2 equal sized boxes for the base, a pizza box for the window, 2 smaller boxes for the shelves. I fixed them all together using duck tape (big duck tape fan). Then I added the details. For the window, I looked for a nice picture from my stack of magazines and glued it on to the pizza box lid. Then I cut up one of my daughter's old dress to make curtains and glued them on. For the sin...

Make Windchimes from Metal Cans

Image
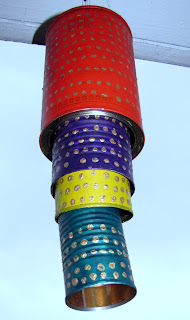
Spring is usually the time when wind-chimes come out to hang. I could see them hanging in many a houses but instead of buying one, I decided to challenge myself into making one. In the spirit of recycling, I began to look around for things that could be used to make windchimes. I narrowed down on metal as the material of choice because it had to make a sound when it clanked together. I also did a google search and saw a few ideas. I decided, metal cans it will be. I spent most of spring collecting metal cans of various sizes. Finally I made two different kind of wind chimes. Cascading Can Chime When I looked at my collection of metal cans, I saw four of them fit inside each other just perfectly. That led me to this cascading wind chime design. I used tiny jingle bells to anchor the cans on the metal wire and also for the sound they make. Materials: metal cans of different sizes metal beading wire small bells acrylic colors Remove any labels from your metal...
Related Posts Plugin for WordPress, Blogger...