Cardboard play kitchen
During the summer I worked on a few craft projects; one of which was a cardboard play kitchen. It is made completely from recycled materials which would otherwise have ended up in trash. I had seen the idea on Spoonful and immediately loved it. It took me a few months to really get working on the idea because it seemed kind of daunting; but once I got to it, it was fun. I am so glad this went from bookmark to reality because my daughter was so excited about it while we were building it and it is still her favourite "toy".
First I started collecting cardboard boxes. 2 equal sized boxes for the base, a pizza box for the window, 2 smaller boxes for the shelves. I fixed them all together using duck tape (big duck tape fan).

Then I added the details. For the window, I looked for a nice picture from my stack of magazines and glued it on to the pizza box lid. Then I cut up one of my daughter's old dress to make curtains and glued them on.
For the sink, I cut a hole in the base box, the size of a takeout container and just pushed the container into the hole. Then I made two holes and used the top of an empty spray bottle and the top of a soap dispenser as faucets.
 On the other side, I made coil burners by using permanent marker to draw rings on disposable plates and glued them in place.

Then I added more details like a small piece of kitchen sponge, a spray bottle for the kitchen sink. My daughter made a coffee grinder type mixie using a plastic cups. We added her play utensils and a few empty containers to her kitchen shelves. I also added a small can to hold all her spoons. I used duck tape around the top edge of the can to take care of any sharp edges.
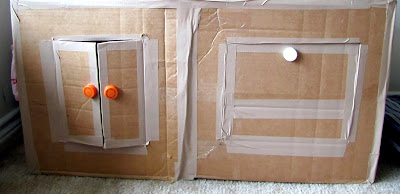
 The final additions were the cabinet and oven. For the cabinet, draw a rectangle the size of the desired cabinet on the box. Draw a vertical line through the center of the rectangle to mark the doors. Using an xacto knife, cut along the vertical door marker line. Then cut the two horizontal lines of the rectangle. You will have your cabinet doors. Use duck tape along the hinges to make them stronger. I also used duck tape over the cut sides to make them softer.
For the oven, I drew a square in the middle of the box and cut three sides. I again used duck tape along the hinges and cut sides. I glued on bottle caps for door knobs on the cabinets and oven. I used goop glue but any strong glue or hot glue can be used.
We have added some more kitchen utensils and play food like pistachio shells to the kitchen since then. My daughter loves to cook in her kitchen. She makes tea, milkshake, pasta and "food". It has provided several hours of fun. If you do plan this project, check out the original instructions on Spoonful.
 |
| finished kitchen |

Then I added the details. For the window, I looked for a nice picture from my stack of magazines and glued it on to the pizza box lid. Then I cut up one of my daughter's old dress to make curtains and glued them on.
For the sink, I cut a hole in the base box, the size of a takeout container and just pushed the container into the hole. Then I made two holes and used the top of an empty spray bottle and the top of a soap dispenser as faucets.


Then I added more details like a small piece of kitchen sponge, a spray bottle for the kitchen sink. My daughter made a coffee grinder type mixie using a plastic cups. We added her play utensils and a few empty containers to her kitchen shelves. I also added a small can to hold all her spoons. I used duck tape around the top edge of the can to take care of any sharp edges.

For the oven, I drew a square in the middle of the box and cut three sides. I again used duck tape along the hinges and cut sides. I glued on bottle caps for door knobs on the cabinets and oven. I used goop glue but any strong glue or hot glue can be used.

We have added some more kitchen utensils and play food like pistachio shells to the kitchen since then. My daughter loves to cook in her kitchen. She makes tea, milkshake, pasta and "food". It has provided several hours of fun. If you do plan this project, check out the original instructions on Spoonful.


Came to your website from Nupur`s one hot stove. SHe had linked back on your post and I simply love it. I also saw that post on Spoonful but never got around to even bookmarking it so you`ve gotten somewhere awesome!
ReplyDeleteWhat a great fun summer project. Love the sink and the window!!!
Shoba
Thanks for your comment! Glad you liked it. Love your website too.
DeleteThat is a cute play kitchen! Love the oven & cabinet doors and knobs. The burners are also pretty cool.
ReplyDeleteThanks for your comment! Glad you liked the kitchen.
Delete